
Tutorials
Converter Guide
The Input Files Converter transforms scientific files into organized input files for the SisMOM/STFM workflow reading the source, interpolating onto your grid, and saving the results into the project folder automatically.
Overview
The Converter adapts raw environmental data whether fetched by the Downloader or downloaded manually to the format, area, and resolution of your project's grid. No programming knowledge required: select a source, add files, and start the conversion.
Five-step workflow: select the project folder → load the grid → choose the source and files → start the conversion → check the monitor and output folders.
Before you begin
- Make sure you can access InputFilesConverter.exe and have read and write permission for the selected folder.
- Prepare the target grid as a valid .txt file.
- Identify the data source before selecting files: GLBy, ESPC-D-V02, or GFS.
- For large files, keep sufficient free disk space and don't close the program while processing is in progress.
Expected grid format
The grid must be a text file with space-separated columns. The converter expects headers equivalent to i, j, longitude, and latitude, following the project standard. If the grid isn't recognized, request a validated grid from the technical lead.
Understanding the main screen
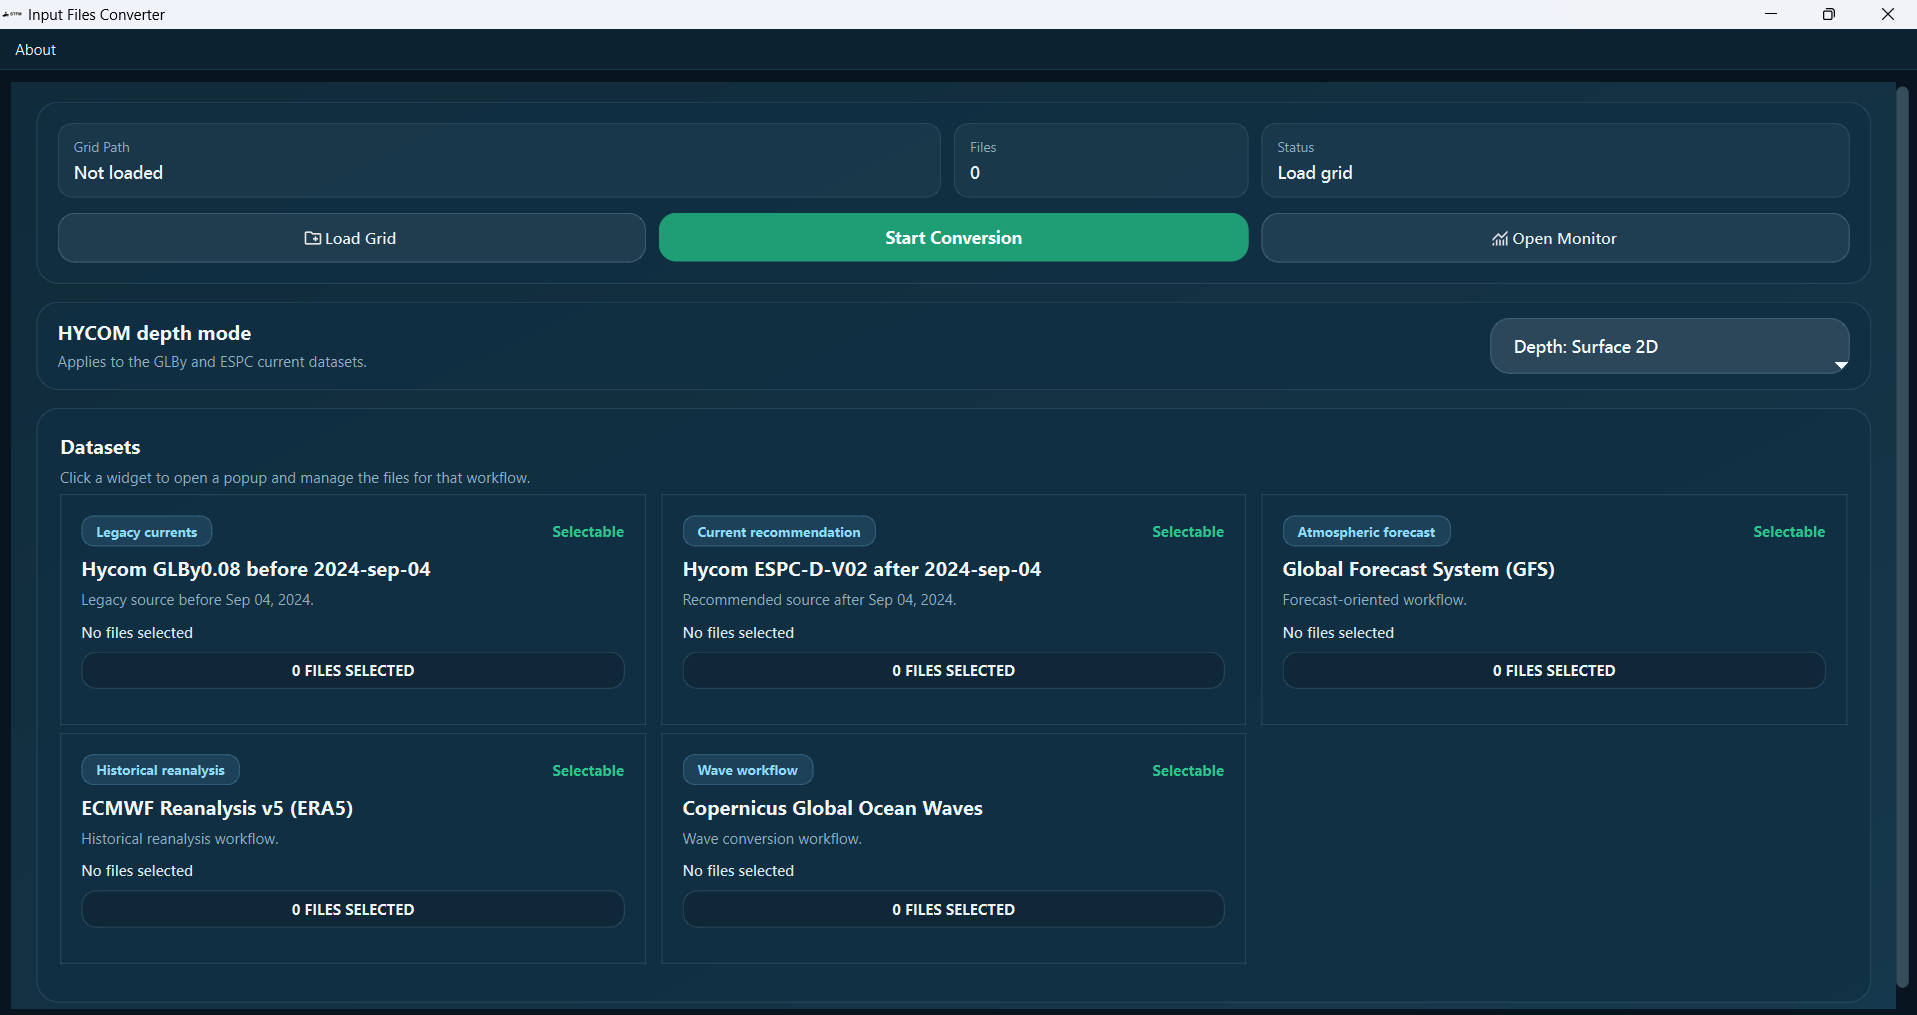
| Area / control | Function |
|---|---|
| Grid Path | Shows the loaded grid. The conversion cannot start while it displays "Not loaded." |
| Files | Total number of attached files. |
| Status | Indicates the next required action. |
| Load Grid | Opens the grid-file selector. |
| Start Conversion | Starts processing the active source. |
| Open Monitor | Opens the monitoring screen. |
| HYCOM depth mode | Selects a 2D surface or multiple 3D levels. Applies only to GLBy and ESPC. |
| Dataset cards | Open the window for adding, previewing, and removing files from the selected source. |
Important: don't mix different sources in the same conversion. The program works with one active source at a time.
Tutorial: your first conversion
Step 1 — Open and select the project folder
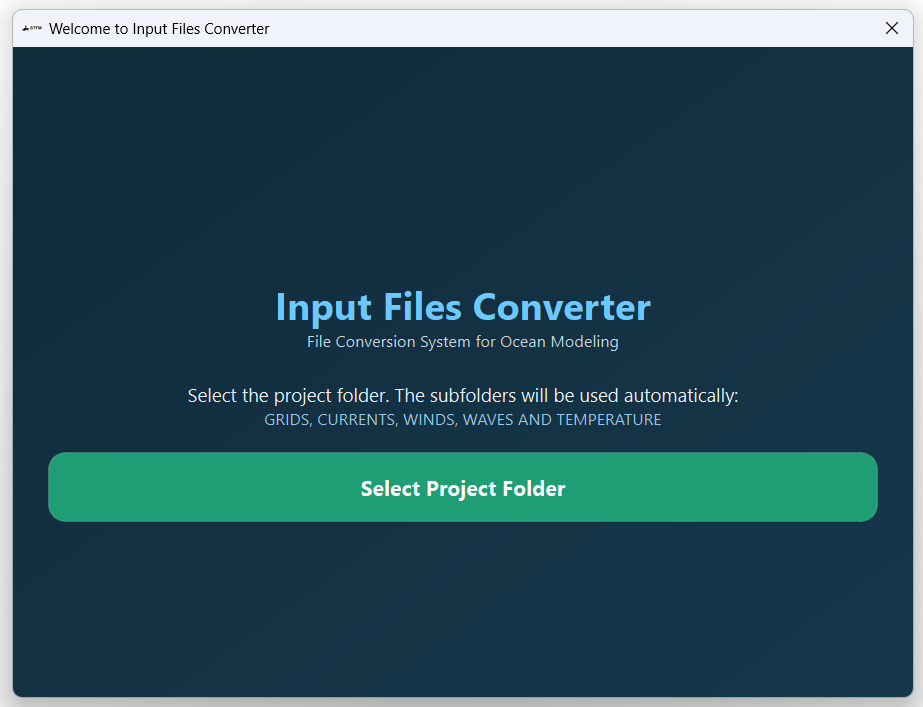
Click Tools → Converter in the STFM Viewer to start the Input Files Converter. On the welcome screen, click Select Project Folder and choose a working folder — preferably the one created by your project in STFM Viewer. If you use another folder, the program automatically creates GRIDS, CURRENTS, WINDS, WAVES, and TEMPERATURE inside it.
Step 2 — Load the grid
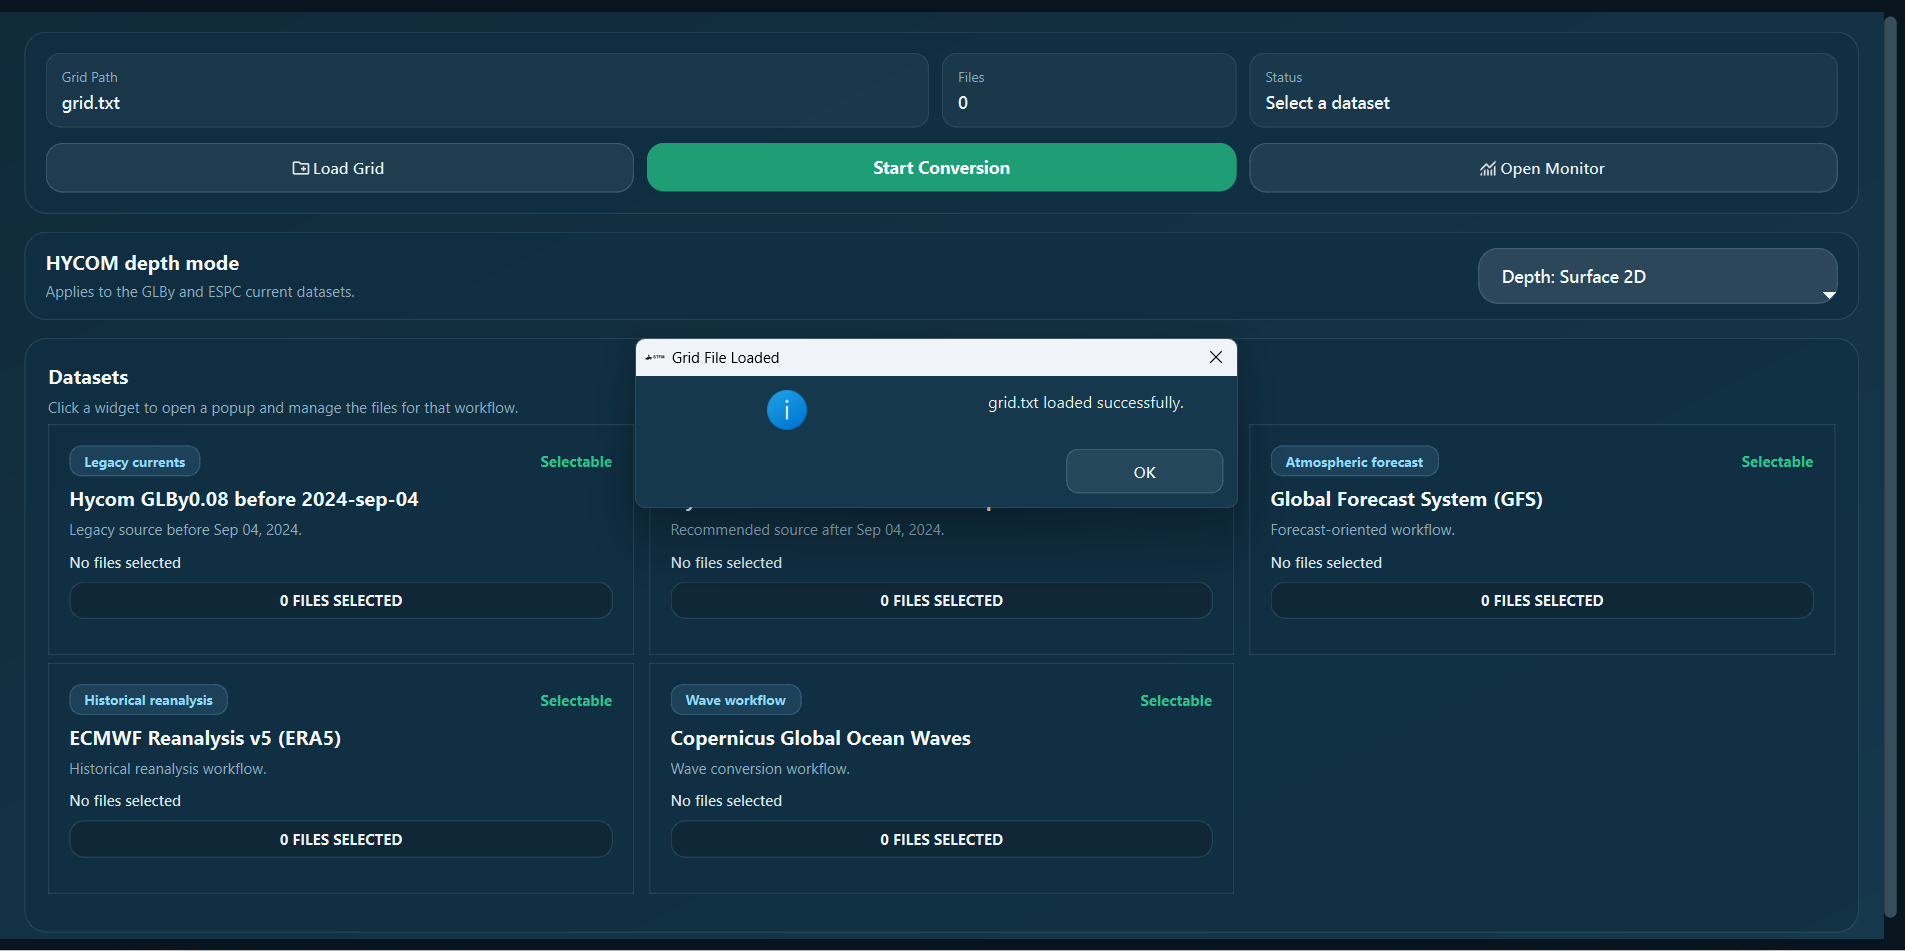
On the main screen, click Load Grid, select the grid .txt file, and confirm. Make sure its name appears in the Grid Path field.
Step 3 — Choose 2D or 3D (HYCOM only)
Under HYCOM depth mode, choose 2D (DEPTH = 0) for surface data or 3D (Multiple Depth Levels) for the water column. This setting isn't used for GFS.

Step 4 — Select the source
Click the card that matches the actual source of your files. Use GLBy for data before Sep 4, 2024, ESPC-D-V02 for data after that date, and GFS for atmospheric forecasts.
Step 5 — Add and check files
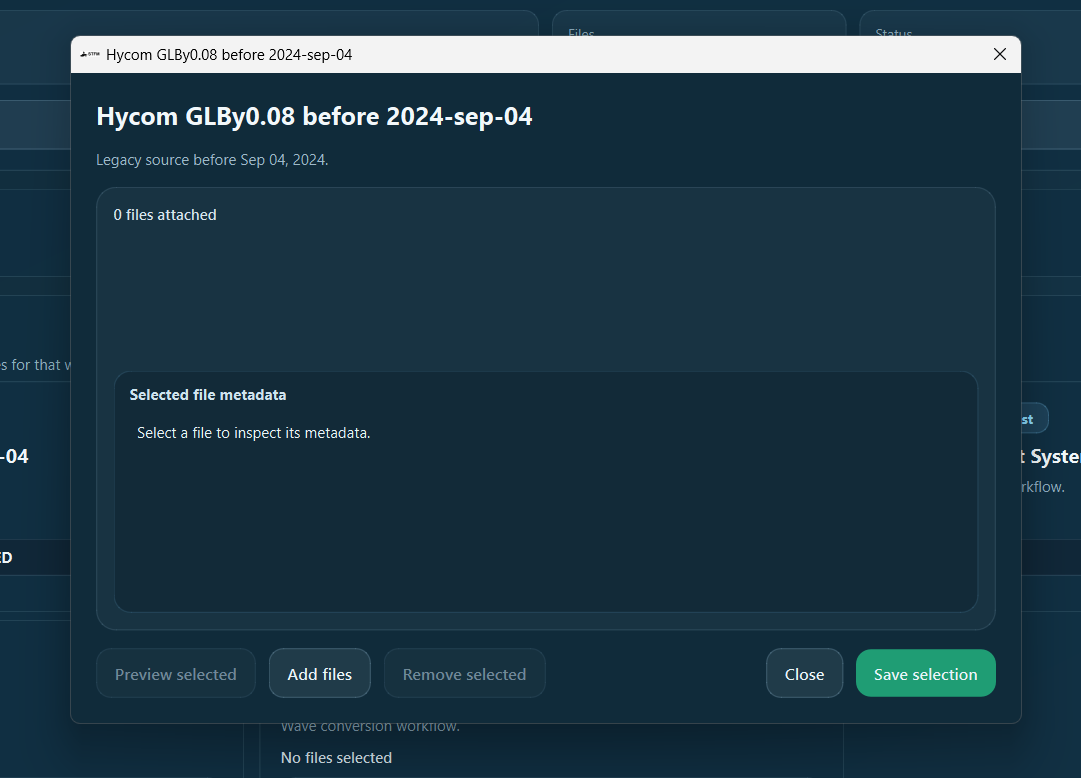
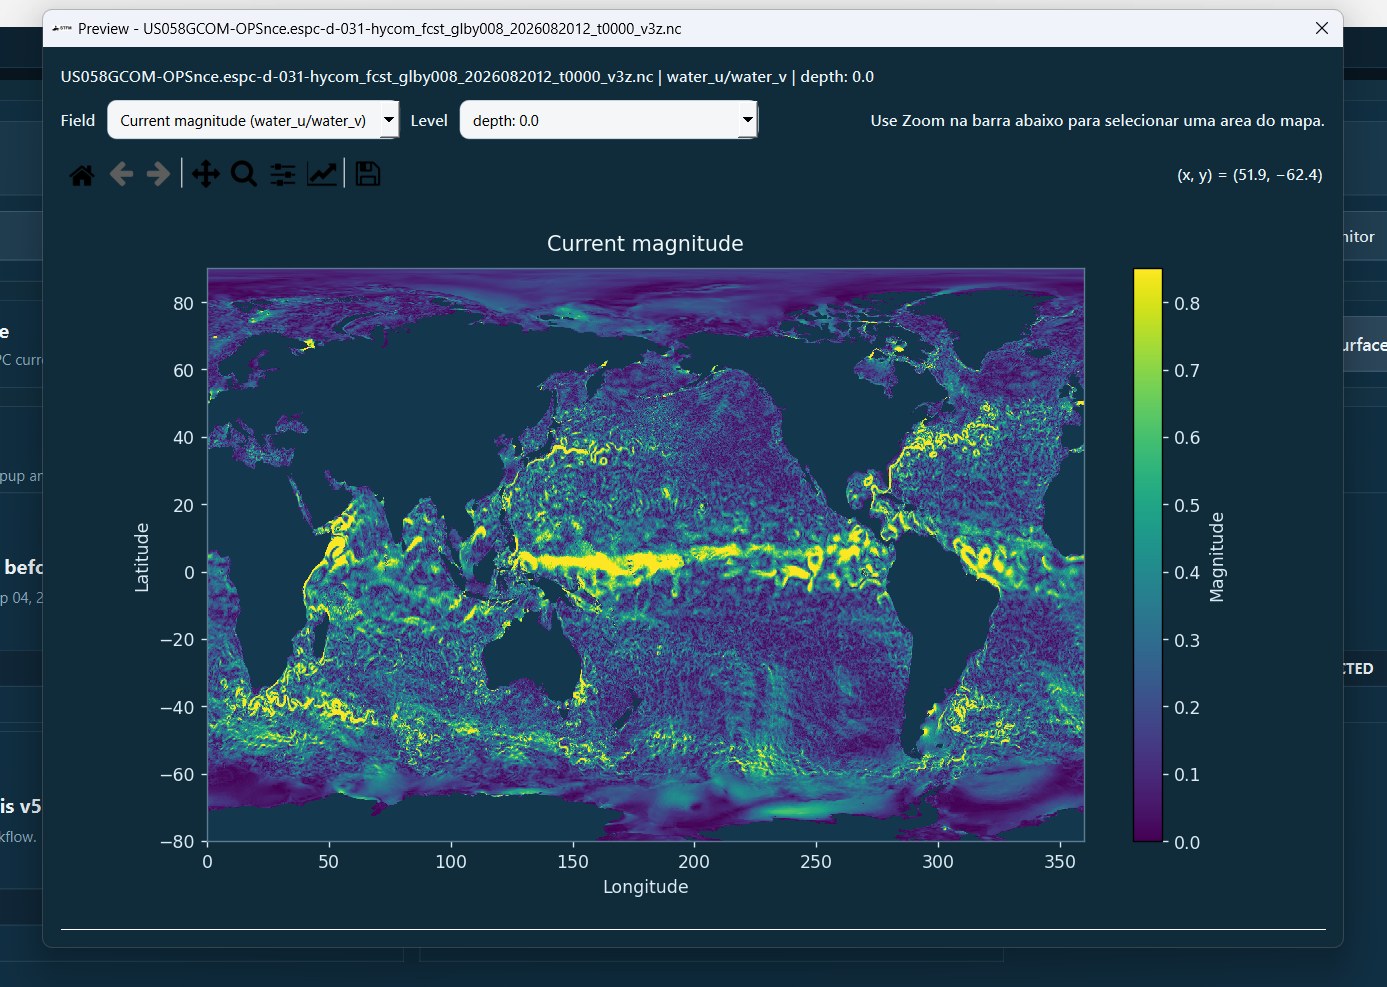
Click Add files and select the files. Automatic diagnostics reject invalid files. Select an item in the list to check its metadata, or use Preview selected for a visual inspection. When finished, click Save selection.
Step 6 — Start the conversion
Confirm that Grid Path is filled in, Files is greater than zero, and the correct source is active. Click Start Conversion. The program opens the monitor and processes the items in the background.
Step 7 — Monitor progress
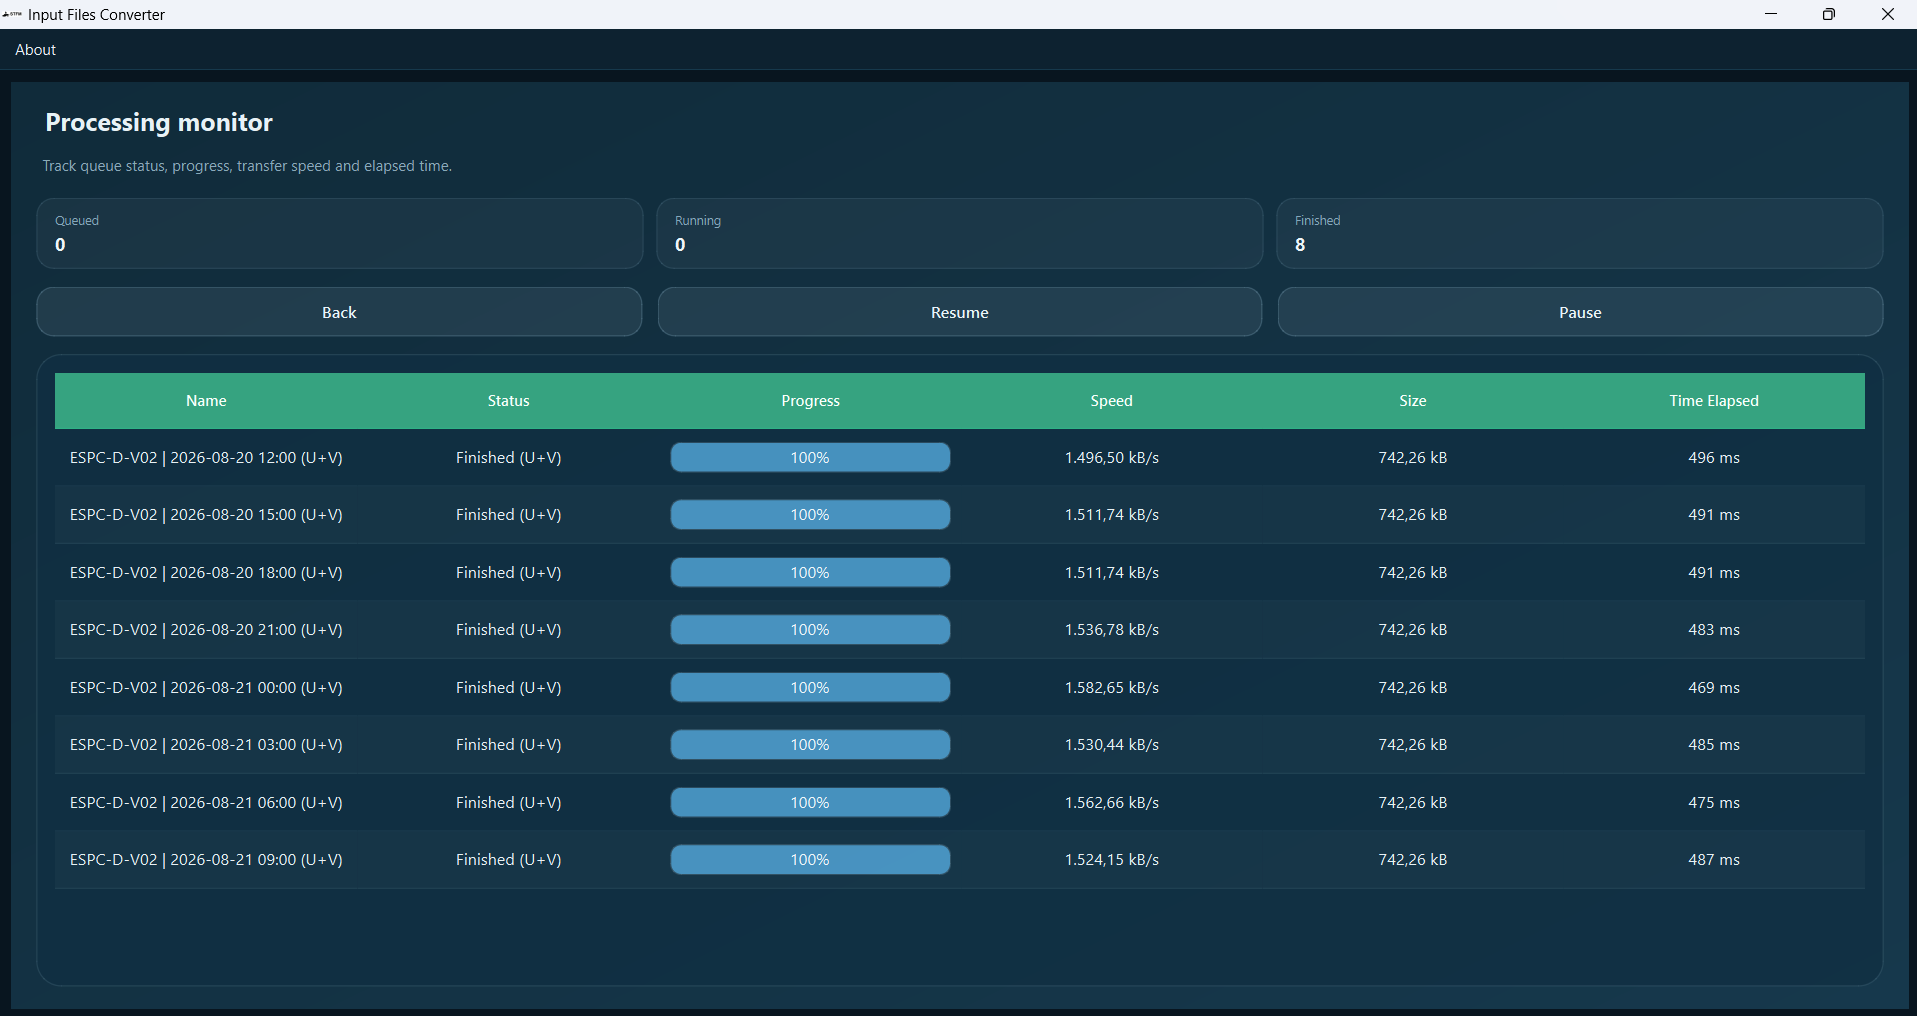
In the monitor, follow Name, Status, Progress, Speed, Size, and Time Elapsed. The most common states are Waiting, Running, Finished, and Error. Wait until every item shows Finished before closing the program.
Step 8 — Locate the results
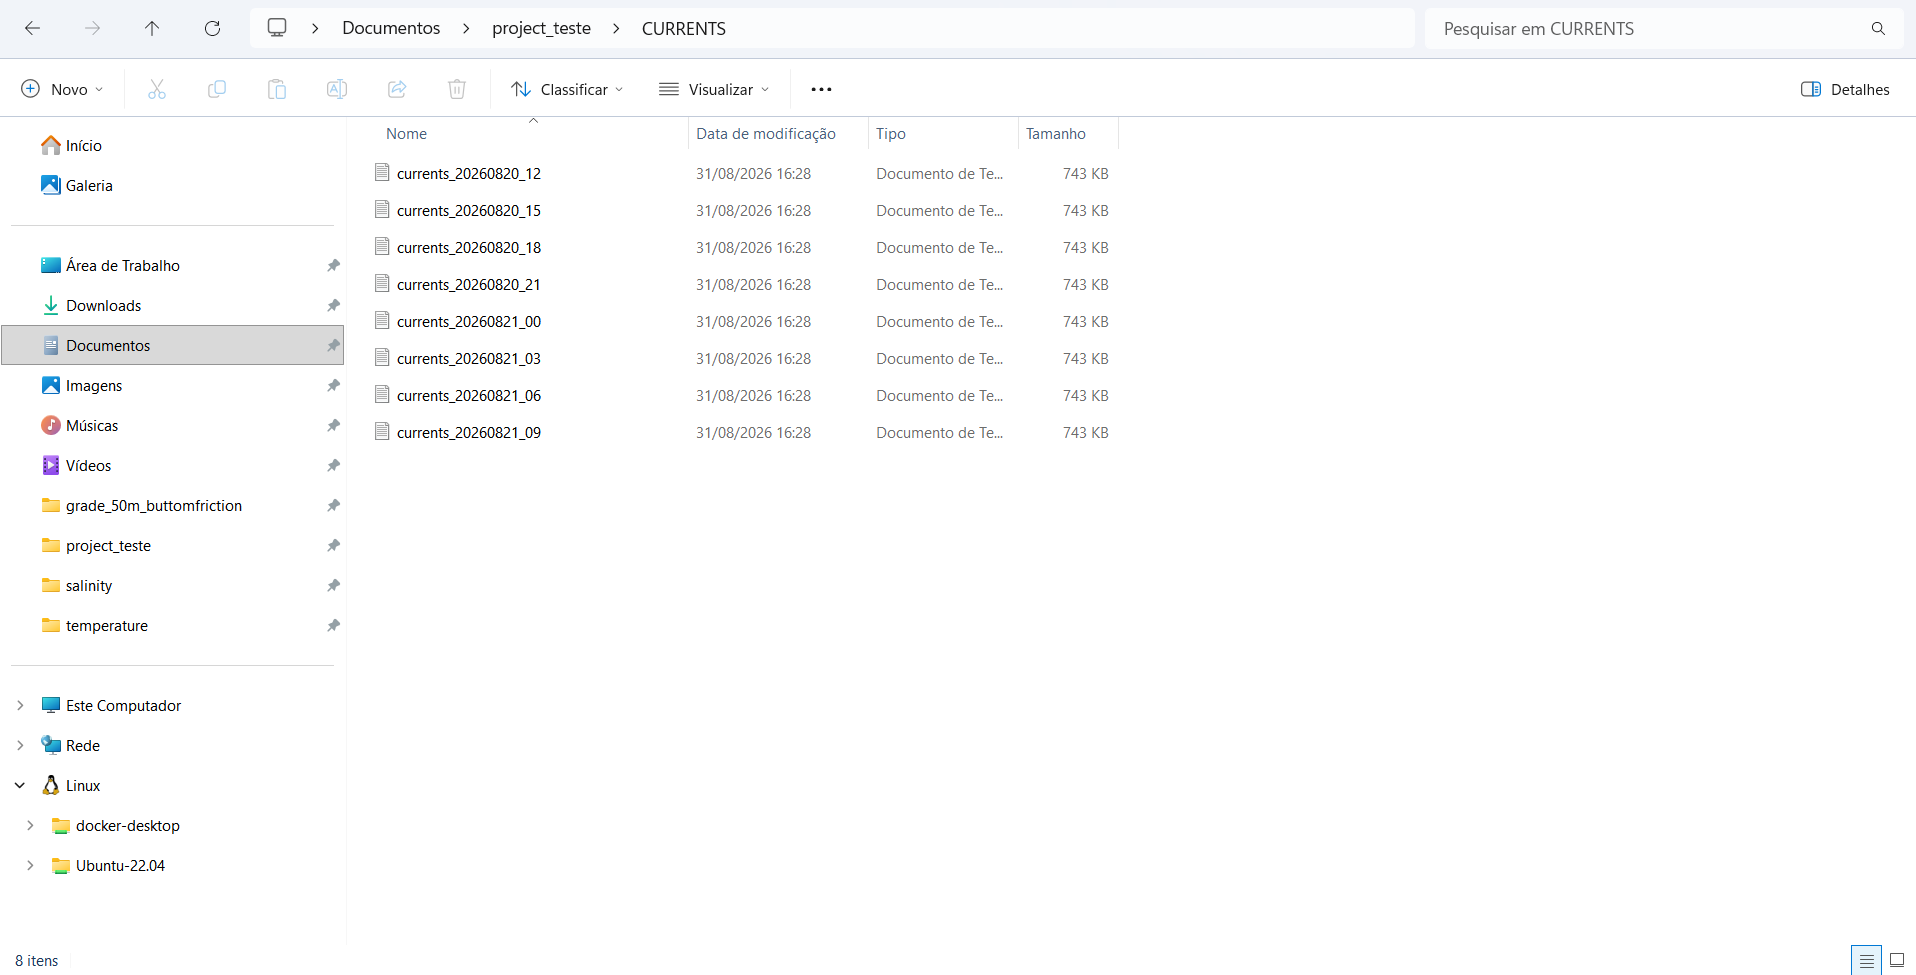
Open the project folder selected in Step 1. Currents are normally stored in CURRENTS; atmospheric results in WINDS; temperature/salinity in TEMPERATURE; and waves in WAVES when that module is available.
Rules by data source
GLBy vs. ESPC: Sep 4, 2024 is the operational cutoff shown in the interface. GLBy is the legacy source before that date; ESPC-D-V02 is recommended afterward. ESPC may distribute variables across separate files, requiring pairs with the same date and time.
| Source | Input | Mode | Main output | Status |
|---|---|---|---|---|
| HYCOM GLBy0.08 | NetCDF (.nc), usually water_u/water_v | 2D or 3D | CURRENTS; possibly TEMPERATURE | Available |
| HYCOM ESPC-D-V02 | NetCDF (.nc) in U+V pairs; optional T+S | 2D or 3D | CURRENTS and, when applicable, TEMPERATURE | Available |
| GFS | GRIB/GRIB2 with 10m wind and 2m air temperature | Not applicable | WINDS | Available |
| ERA5 | NetCDF containing u10, v10, and t2m | Not applicable | WINDS | Unavailable in this version |
| Copernicus Waves | NetCDF containing VHM0, VSDX, and VSDY | Not applicable | WAVES | Unavailable in this version |
ERA5 and Copernicus Waves show up as cards, but don't work yet. The program displays "Module Unavailable" when you open them. If your project needs ERA5 winds right now, see the ERA5 Guide — you'll need to prepare that conversion by another means until this module ships.
ESPC specifically: the U and V components must exist for the same timestamp. When temperature and salinity are used, T and S must also form pairs for the same timestamp.
Messages & troubleshooting
| Message / symptom | Likely cause | How to resolve it |
|---|---|---|
| No grid file loaded! | No grid has been loaded. | Click Load Grid and select a valid .txt grid. |
| No file selected! | The active source has no saved files. | Open the card, use Add files, and finish with Save selection. |
| Files from different sources cannot be mixed. | Files from different sources were combined. | Remove previous selections and use only one dataset per run. |
| Select 2D or 3D mode! | HYCOM mode hasn't been set. | Choose 2D or 3D under the depth control. |
| Error Loading File | Unrecognized format, content, or structure. | Check the extension and metadata; retry with an intact file from the correct source. |
| Module Unavailable | ERA5 or Copernicus isn't enabled yet. | Use an available module or wait for a new version. |
| Status Error | Failure while reading, interpolating, or writing. | Check disk space, permissions, the grid, and variable compatibility; retry with one file at a time. |
| ESPC does not form pairs | U/V or T/S have different dates, or one component is missing. | Add all components for the same timestamp and check the metadata. |
If the problem persists
- Record the source name, the 2D/3D mode, and the displayed message.
- Record the grid name and the name of a file that reproduces the error.
- Provide the expected output folder and state whether any partial result was created.
- Send this information to technical support without renaming or modifying the sample file.
Final checklist
- The correct project folder has been selected.
- The grid appears under Grid Path.
- Only one data source is active.
- The 2D/3D mode is correct for HYCOM.
- The files passed diagnostics and their metadata was checked.
- U+V pairs (and T+S, if used) have the same date/time in ESPC.
- All monitor items reached Finished.
- The generated files were found in the corresponding output folder.
Glossary
| Term | Meaning |
|---|---|
| Dataset | A collection of data from a specific source and product. |
| Grid | A list of latitude/longitude points onto which the data will be interpolated. |
| NetCDF | A scientific format used by oceanographic and atmospheric products. |
| GRIB/GRIB2 | A common weather-forecast format used by GFS. |
| 2D | A surface field, in the mode indicated as DEPTH = 0. |
| 3D | A field with multiple depth levels. |
| U and V | Vector components that together represent current or wind. |
| Interpolation | A calculation that transfers values from the original grid to the project grid. |
Get Started
Ready to run a simulation?
Follow the full guide from installation to your first result.